I'm going to continue blogging but not here. New blog: http://cortneyparsons.wordpress.com/
Thursday, May 17, 2012
Wednesday, May 9, 2012
Final Course Summary
Throughout this semester,
I was able to acquire a lot of knowledge from Digital File Preparation that I
know will be beneficial to me in the future. Prior to taking this class I
wasn’t really even aware that there was a right and a wrong way to prepare a
file, I was mainly just interested in whether or not the design was
aesthetically appealing. While I still think the aesthetics of a design are
tremendously important, I now realize that if the file isn’t prepared correctly,
and as a result doesn’t print the way it was intended, it doesn’t matter how
well it is designed. So the main takeaway for me from this class was that the
design and preparation aspect are of equal importance, every project must have
both to be effective.
Additionally, I was able
to improve my proficiency in InDesign, Photoshop, and Illustrator through
working on the various projects over the course of the semester. I really
enjoyed all the projects we completed, though I wish design could have been
more of an emphasis. I understand that the course is structured to focus on
file preparation but just as a design is useless if not prepared well, a well
prepared file is useless if not designed well.
Overall, I really liked
this class. I feel like I was challenged and learned a lot from it.
Wednesday, May 2, 2012
Adobe Tutorial: How to Replace the Sky in a Photo
Step 1: Select all of the original photo (command + A) and copy it.
Step 2: Paste it into the replacement sky document window. The original photo is now on its own layer (layer 1) and will be blocking the replacement sky photo.
Step 3: Duplicate the original photo (command + J)
Step 4: Remove the visibility of the top layer (the duplicated original photo) by clicking on the visibility icon to the far left of the layer's preview thumbnail.
Step 5: Click on layer one to make it the active layer.
Step 6: Select the area of the original photo you want to protect by using one of the lasso tools or the quick selection tool.
Step 7: Once you have the area selected you want to protect, convert the selection to a layer mask by clicking on the layer mask icon at the bottom of the Layers Panel.
Step 8: Turn on the visibility of the top layer.
Step 9: Double click on the layer's preview thumbnail. This will open the Layer Style dialog box Blending Options. In the Advanced Blending section, change the Blend If option to Blue.
Step 10: On the This Layer slider bar, drag the right slider to the left. This will cause the sky in the original photo will to disappear, keep dragging until most of it is gone.
Step 11: Hold option (or alt for windows) on your key board and click on the slider and keep dragging toward the left. This will split the slider into two. Now you can adjust them independently of each other. Adjust the sliders until you are happy with the result, then click okay to complete the sky replacement.
sources:
http://www.photoshopessentials.com/photo-editing/replace-sky/
Photos were downloaded from flickr.com creative commons
Step 2: Paste it into the replacement sky document window. The original photo is now on its own layer (layer 1) and will be blocking the replacement sky photo.
Step 3: Duplicate the original photo (command + J)
Step 4: Remove the visibility of the top layer (the duplicated original photo) by clicking on the visibility icon to the far left of the layer's preview thumbnail.
Step 5: Click on layer one to make it the active layer.
Step 6: Select the area of the original photo you want to protect by using one of the lasso tools or the quick selection tool.
Step 7: Once you have the area selected you want to protect, convert the selection to a layer mask by clicking on the layer mask icon at the bottom of the Layers Panel.
Step 8: Turn on the visibility of the top layer.
Step 9: Double click on the layer's preview thumbnail. This will open the Layer Style dialog box Blending Options. In the Advanced Blending section, change the Blend If option to Blue.
Step 10: On the This Layer slider bar, drag the right slider to the left. This will cause the sky in the original photo will to disappear, keep dragging until most of it is gone.
Step 11: Hold option (or alt for windows) on your key board and click on the slider and keep dragging toward the left. This will split the slider into two. Now you can adjust them independently of each other. Adjust the sliders until you are happy with the result, then click okay to complete the sky replacement.
 |
| replacement sky |
 |
| original photo |
 |
| final result |
sources:
http://www.photoshopessentials.com/photo-editing/replace-sky/
Photos were downloaded from flickr.com creative commons
Sunday, April 22, 2012
Job Search Analysis 3
Junior Creative
Designer
The Junior Creative
Designer will primarily provide assistance to the creative team designers on a
variety of different projects (brand promotions, packaging development, online
and print advertisements, etc.) to ensure the projects are both accurate and
completed by the scheduled deadline. Responsibilities of this position are
project planning, development, management, and execution; assisting with the
management of all print and online materials, including updates and revisions;
maintain consistency throughout all the brand properties as well as give
strategic suggestions to improve products and brand presence; assists as the
contact to outside vendors and other departments; good understanding of digital
media, branding, and interactive design; and contributes to other
communications and related assignment as needed.
Education Requirement: Bachelor’s degree in Graphic Design, Visual
Communication, or comparable study.
Preferred Skills &
Software:
·
Experience in
creating print documents, pre-press to press checks.
·
Adobe CS:
Photoshop, InDesign, Illustrator, etc.; Microsoft Office: Excel, Outlook, Word, Powerpoint.
·
Video editing,
HTML, and social media experience is preferred.
·
Exceptional
communication, organizational, and management skills.
·
Self-motivated,
problem-solver
Salary Range: The salary range for a Designer (print, web, and
interactive) is $40,000 to $55,000.
Years of Experience: Entry-level position
Thursday, April 19, 2012
Lawsuit Article Review
The North Face Apparel
Corporation vs. The South Butt LLC
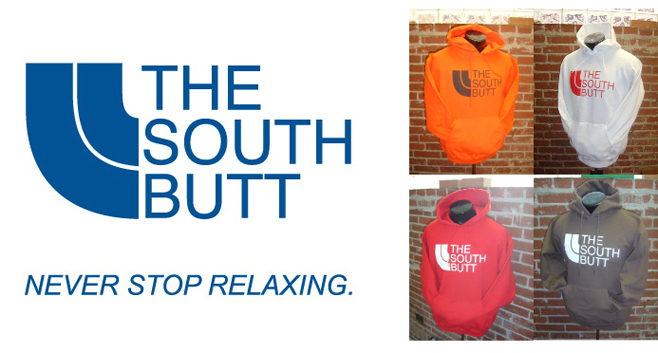
In December of 2009, The
North Face Apparel Corp. filed a lawsuit against the The South Butt LLC—a
parody apparel line created by University of Missouri student Jimmy Winkelmann.
The North Face filed the lawsuit based on allegations that The South Butt was
“marketing apparel that directly and unabashedly infringes and dilutes The
North Face’s famous trademarks and duplicates The North Face’s trade dress in
its iconic Denali jacket.” The South Butt was created as a parody of The North
Face. Its brand identity (logo, tag line, apparel, etc.) is remarkably similar,
if not exactly the same, as The North Face. Does piracy under the assertion
of parody make it okay? The lawsuit was settled in
April of 2010. However, the terms of the settlement agreement were not
disclosed.


Article sources:
Image sources:
Job Search Analysis: Position 2
RELEVANT Magazine: Designer
Job Description: The Designer position is involved in a vast range
of design projects. These projects include: magazine and book design, marketing
campaigns, content-driven website design, story graphics, client projects, and
beyond. Print is the foundation at RELEVANT, however digital media also plays a
significant role in what we do. Therefore, a versatile designer who has
experience in both print and web are preferred. The ideal candidate filling
this position is a creative, big picture thinker and problem solver who stays
current with the latest design trends and has an exceptional ability to
self-manage.
Education Requirement: Degree in graphic design or equivalent experience
Preferred skills &
software:
·
Proficiency in
Adobe InDesign, Photoshop, and Illustrator is required
·
Experience in
editorial and marketing design and motion and digital design
·
Able to
multitask, meet deadlines, and work in a team environment
·
Knowledgeable
about typography
·
Interest in
RELEVANT’s audience and subject matter
Salary Range: The salary range for a Designer (print, web, and
interactive) is $40,000 to $55,000.
Experience: 1+ year of agency or media experience
Sources:
Monday, April 16, 2012
Adobe Software Tutorial
Photoshop: Quick HDR Effect
Steps:
Step 1: Duplicate the original image.
Step 2: Name the copy Shadows/Highlights. Go to Image > Adjustments > Shadows/Highlights. Set the Shadows and Highlights amount to 50%.
Step 3: Duplicate the layer and name the copy Desaturate. Go to Image > Adjustments > Desaturate. Then change the layer blending mode to Hard Light.
Step 4: Duplicate the original image and name the copy Blur. Go to Filter > Blur > Gaussian Blur and set the radius to 40 pixels. Then move the layer on top of the other layers and set the layer blending mode to Soft Light.
Step 5: Flatten the image and save.
Source: http://www.icanbecreative.com/quick-hdr-effect-photoshop-cs5-tutorial.html
(image was taken by me.)
 |
| Start Image |
 | ||||
| End Image |
Steps:
Step 1: Duplicate the original image.
Step 2: Name the copy Shadows/Highlights. Go to Image > Adjustments > Shadows/Highlights. Set the Shadows and Highlights amount to 50%.
Step 3: Duplicate the layer and name the copy Desaturate. Go to Image > Adjustments > Desaturate. Then change the layer blending mode to Hard Light.
Step 4: Duplicate the original image and name the copy Blur. Go to Filter > Blur > Gaussian Blur and set the radius to 40 pixels. Then move the layer on top of the other layers and set the layer blending mode to Soft Light.
Step 5: Flatten the image and save.
Source: http://www.icanbecreative.com/quick-hdr-effect-photoshop-cs5-tutorial.html
(image was taken by me.)
Subscribe to:
Posts (Atom)